
Updated October 2026: code and package versions refreshed for current releases.
In this article we will learn about implementing JWT authentication in NodeJs using simple and easy to understand code and clean code practices. Every application nowadays has some sort of authorization and authentication as most of the applications require registration and login as an entry point to an application. And once the user is logged in we allow user to have access to resources based on his authentication status. This is where JWT authentication comes into play. Lets dive in to understand more about it.
Checkout this complete source code for Implementing JWT Authentication in NodeJS here.
What is a JWT token?
JSON Web Tokens are an open, industry standard RFC 7519 method for representing claims securely between two parties.
jwt.io
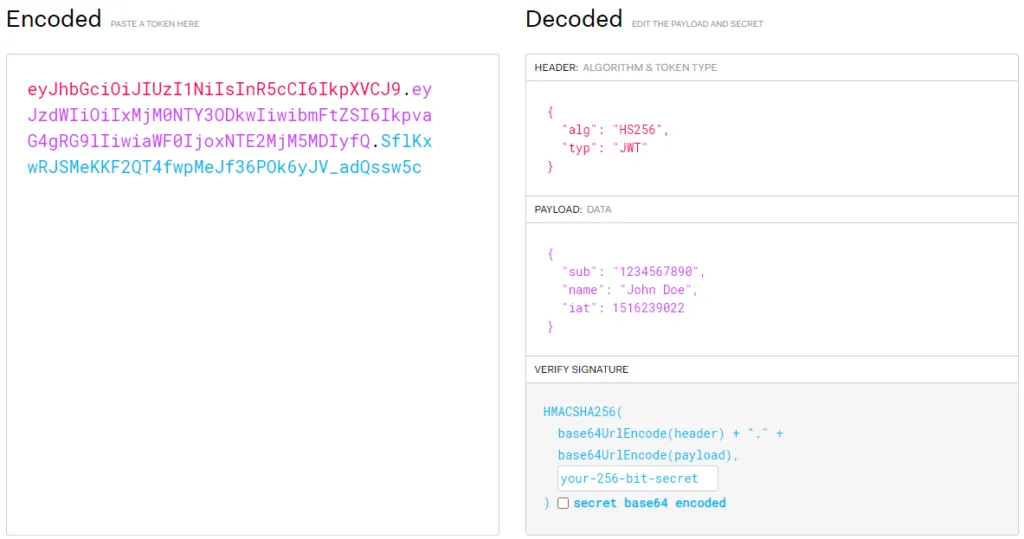
Above we have the encoded and decoded version of a JWT token. Encoded JWT token is what we send to and from the client to authorize the user to different resources. Decoded JWT has 3 distinct parts which when we encode gets separated with dots (.) in between.
- Header - contains the algorithm which is used to encode and decode the JWT.
- Payload - information stored in token.
- Signature - which checks if the token has not been tampered with, with the help of a secret key.
JWT Authentication in NodeJs
Let's start implementing JWT authentication in NodeJs. We are using visual studio code as the IDE for this implementation which is one of the best IDE available to developers according to me. Before we start, make sure you have a current LTS release of NodeJs installed (Node.js 24 at the time of writing) and MongoDB, as we will be using it as our database to store user information. Then create a project folder and install the packages below with npm.
- Express 5 (
express@5, currently 5.3.0) - Mongoose 9 (
mongoose@9, currently 9.11.1, requires Node.js 20.19 or newer) - jsonwebtoken 9 (
jsonwebtoken@9, currently 9.0.3) - bcrypt 6 (
bcrypt@6, currently 6.0.0) - dotenv 18 (
dotenv@18, currently 18.0.7)
Creating User Model
To store the user information in mongo database we need to create a new model for the users. Inside root folder create folder named models and add users.model.js file.
const mongoose = require('mongoose')

const userSchema = new mongoose.Schema({
    username: {
        type: String,
        unique: true,
        required: true
    },
    password: {
        type: String,
        required: true
    }
})

mongoose.model('User', userSchema)
Here we created a user model containing username and password using mongoose. Username will accept only unique values in database.
Mongoose provides a straight-forward, schema-based solution to model your application data. It includes built-in type casting, validation, query building, business logic hooks and more, out of the box.
https://mongoosejs.com/
Registration Controller
To register new users we need a registration logic in our controllers. Inside root folder create a folder named controllers and add a registration.controller.js file.
const mongoose = require('mongoose')
const bcrypt = require('bcrypt')
const user = mongoose.model('User')

module.exports.register = async (req, res) => {
    console.log('registering user')
    try {
        const hashedPassword = await bcrypt.hash(req.body.password, 10)
        const newUser = await user.create({
            username: req.body.username,
            password: hashedPassword
        })
        console.log('user registered successfully!!', newUser)
        res.status(201).json(newUser)
    } catch (err) {
        console.log(err)
        res.status(400).json(err)
    }
}
We import our user model to perform database operations, and bcrypt, a library used to hash passwords. Install bcrypt using the command below.
npm i bcrypt
The register function hashes the password using bcrypt.hash and then adds a user with the username and hashed password. Express 5 automatically passes errors from async handlers to the error handler, but we catch errors here so we can return a 400 status with the database error message, such as a duplicate username.
Login Controller (generating JWT token)
To login we will write login logic in our controllers. Inside controllers folder add a login.controller.js file.
const mongoose = require('mongoose')
const bcrypt = require('bcrypt')
const jwt = require('jsonwebtoken')
const user = mongoose.model('User')

module.exports.login = async (req, res) => {
    console.log('logging user')
    try {
        const foundUser = await user.findOne({ username: req.body.username })
        if (!foundUser) {
            console.log('invalid user')
            return res.status(401).send('user does not exist!')
        }
        const isMatch = await bcrypt.compare(req.body.password, foundUser.password)
        if (isMatch) {
            console.log('user logged in!')
            const token = jwt.sign({ username: foundUser.username }, process.env.JWT_SECRET, { expiresIn: '5m' })
            res.status(201).json({ loggedIn: true, token })
        } else {
            console.log('user login failed!')
            res.status(401).json('Unauthorized: Wrong Password!!')
        }
    } catch (err) {
        res.status(400).json(err)
    }
}
We require jsonwebtoken, the JSON web token implementation for NodeJs. Install it using the command below.
npm i jsonwebtoken
First we check if the requested username exists. If not, we send a 401 status with an error message.
Next we use the bcrypt compare function to check if the entered password matches the registered password. If it does not match, we send a 401 status with an error message.
Finally we create and send our JWT token by signing it with the user information, a secret, and an expiry time of 5 minutes ('5m'). The secret is read from process.env.JWT_SECRET, which we set in a .env file (see the Setting up Express Server section). Never hardcode the secret in your source code, and keep the .env file out of version control.
Authentication Middleware (Validating JWT token)
Once the user is logged in, we will need to authenticate the logged in user every time user sends a request. For this we will implement a middleware which will check if the user has a valid token. If token is valid, then request is processed further by passing to the next handler. Inside root folder create folder named middleware and add a authentication.js file
const jwt = require('jsonwebtoken')

module.exports.isAuthenticate = (req, res, next) => {
    const authHeader = req.headers.authorization
    if (!authHeader) {
        return res.status(403).send('token Unavailable!!')
    }

    const token = authHeader.split(' ')[1]
    try {
        const decoded = jwt.verify(token, process.env.JWT_SECRET)
        req.user = decoded.username
        next()
    } catch (err) {
        console.log(err)
        res.status(401).json({ message: err.message })
    }
}
JWT token is passed in the authorization header, hence here we are checking if the user request contains it in the header.
From the authorization header we extract the JWT token. It is passed in this format in the authorization header: Bearer yourJWTtoken.
We verify the token using the jwt.verify function and our secret. Without a callback, jwt.verify throws an error when the token is invalid or expired, so we wrap it in a try/catch. If verified, we read the username property from the decoded token payload and map it to the request object. Otherwise we send a 401 status with the error message.
Setting up Routes
For users to actually reach login and registration controller we need to setup routes. Inside root folder, create folder named routes and add index.js file.
const express = require('express');
const router = express.Router();

const registrationCtrl = require('../controllers/registration.controller');
const loginCtrl = require('../controllers/login.controller');
const homeCtrl = require('../controllers/home.controller');
const { isAuthenticate } = require('../middleware/authentication');

// Authentication
router.post('/users/register', registrationCtrl.register);
router.post('/users/login', loginCtrl.login);
router.get('/home', isAuthenticate, homeCtrl.home);

module.exports = router;
We require the registration and login controllers and direct registration and login requests to their respective controllers.
We have also created a dummy home route which we will use to test access from a logged in user. We use the authenticate middleware which we created above to authenticate the user first and then allow access to home. We create a home.controller.js in controllers folder. Code for home controller is as follows.
module.exports.home = (req, res) => {
    console.log('home!');
    res.status(201).json(`Welcome ${req.user}`)
}
Setting up Express Server
Now with most of our functionality completed we need to setup our server. In root folder create app.js file, this is our main file.
The secret is kept in a .env file in the root folder, so that it is not hardcoded in our code:
JWT_SECRET=replace-this-with-a-long-random-string
You can generate a random value with the following command, and add .env to your .gitignore file.
node -e "console.log(require('crypto').randomBytes(64).toString('hex'))"
Install dotenv to load the .env file, and nodemon as a development dependency to restart the server on changes:
npm i dotenv
npm i -D nodemon
require('dotenv').config();
const mongoose = require('mongoose');
require('./models/users.model');
const express = require('express');
const usersRoute = require('./routes/index.js');

if (!process.env.JWT_SECRET) {
    throw new Error('JWT_SECRET is not set. Add it to your .env file.');
}

const port = process.env.PORT || 8000;
const dbURI = 'mongodb://localhost:27017';

const app = express();

app.use(express.urlencoded({ extended: false }));
app.use(express.json());

mongoose
    .connect(dbURI)
    .then(() => console.log('Database Connected'))
    .catch((err) => console.log(err));

app.use('/', usersRoute);

// catch 404 and forward to error handler
app.use((req, res) => {
    res.status(404).json({
        message: 'No such route exists'
    });
});

// error handler
app.use((err, req, res, next) => {
    res.status(err.status || 500).json({
        message: 'Error Message'
    });
});

module.exports = app;

app.listen(port, () => {
    console.log(`Listening to requests on http://localhost:${port}`);
});
Line 1: we load the variables from the .env file with dotenv, before anything reads process.env. We then stop the server from starting if the secret is missing.
Line 2-3: we required mongoose and the user model we created.
Line 4: we required express, used as a NodeJs framework to manage server and routes.
Line 10: using port 8000 (or the PORT variable) to run our express server on localhost.
Line 14-18: connecting to the mongo database instance running on our localhost. Mongoose 9 no longer needs the useNewUrlParser and useUnifiedTopology options, so we do not pass them.
Line 19: redirecting all the incoming requests to the respective user routes.
The 404 and error handlers are registered after the routes. The error handler must keep all four parameters (err, req, res, next) so Express recognizes it as error-handling middleware.
Testing NodeJs APIs with VSCode REST Client
To start testing we need to run our express server. Run the following command in the root folder and ensure that the server is up and running.
nodemon app.js
Or
node app.js
I use nodemon because it automatically restarts the server whenever any changes are saved unlike normal node command to start server. On successful execution of command, you will see following message in terminal.

To test our APIs we will use VSCode REST Client, this is another advantage of using VSCode that we can test our APIs directly from the IDE apart from rapid API development. Let's first make sure to install REST Client in VSCode extensions.
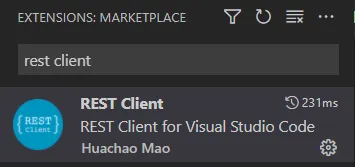
Lets begin testing Our APIs.
Registering new user
First we will test our registration API by creating a new user. Create a new file named registrationAPITest.rest in root folder and write the following code.
POST http://localhost:8000/users/register
Content-Type: application/json

{
    "username": "Azzan Khan",
    "password":"password@123"
}
Here we are sending a POST request to our localhost at the users/register endpoint with the username and password of a new user in the request body. You will see a send request option above the first line if REST Client is installed. Hit it, and we will get the following response.
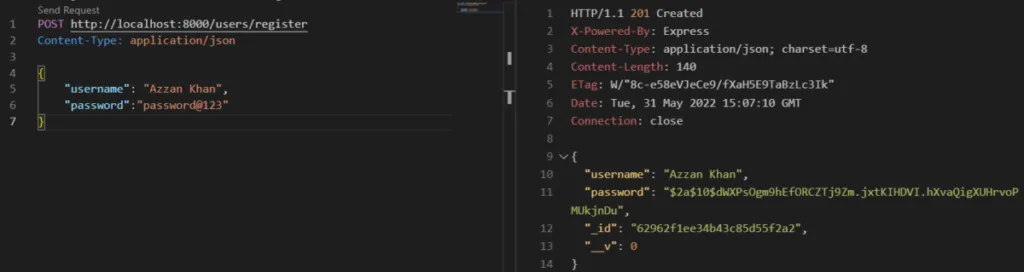
We can see on hitting register api we get the response back with user object containing username and hashed password along with status code 201. This depicts that our user is successfully registered and his record is stored in database. He can look into the database to verify if the user is stored in database with help the help of MongoDB Compass. Install MongoDB Compass from https://www.mongodb.com/try/download/compass if not installed already.
Once you open MongoDB Compass. You will see the following screen.
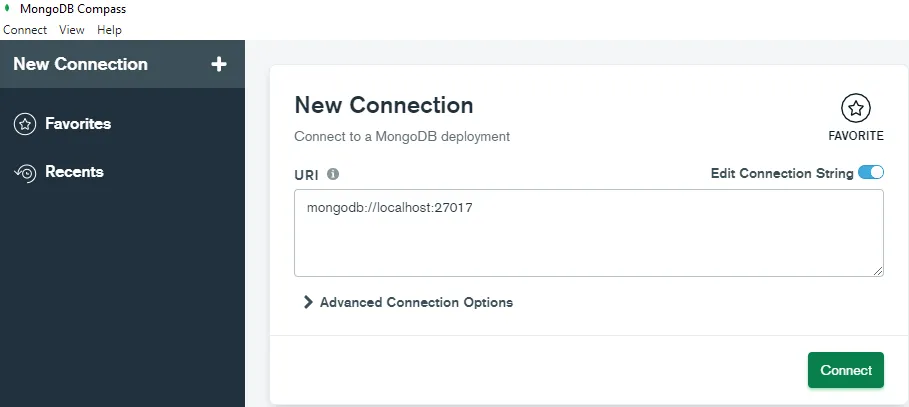
Here by default it presents you localhost:27017 to connect to. Hit connect, and you will be connected to a mongo database. This is the same localhost port we configured our express server to connect in app.js file.
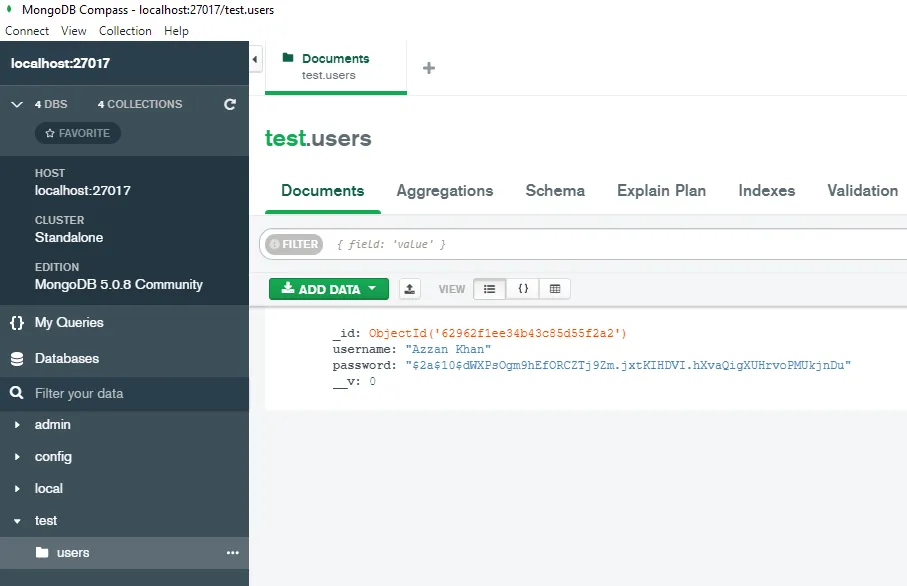
Once connected, you will see some databases on left panel. Navigate to test and you will find a collection named users which got created automatically when we registered the user. In users we can see the user that we created with username and hashed password.
Logging In - Generating JSON Web Token
Now that we have seen that our registration functionality is working fine, we will now try to login with the same user we created above. Create a new file named loginAPITest.rest in root folder and write the following code.
POST http://localhost:8000/users/login
Content-Type: application/json

{
    "username": "Azzan Khan",
    "password":"password@123"
}
Here we are sending a POST request to our localhost at the users/login endpoint with the username and password of the user that we created above while registering, in the request body. Hit send request option above the first line and we will get the following response.
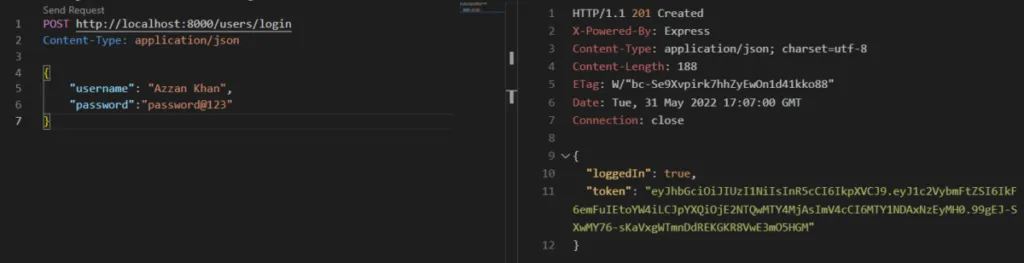
We can see on hitting login api we get the response back with a object containing loggedIn property as true and JWT token along with status code 201. This depicts that our user is successfully logged In. Now if we copy this token and head to jwt.io and paste it there.
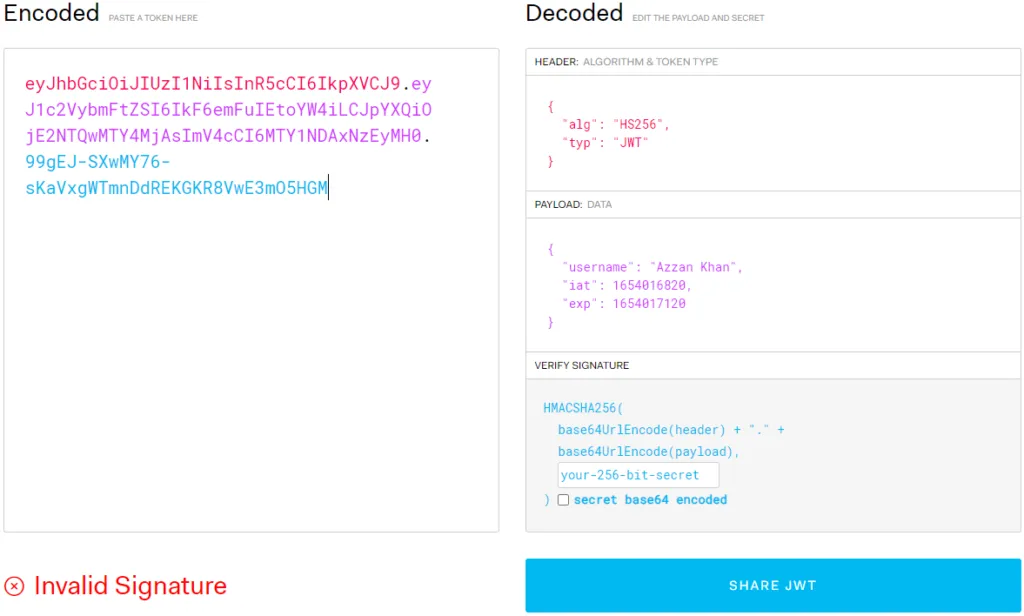
We can see that when we paste our JWT token on left we get our JWT payload with username along with issued at (iat) and expiry (exp) time. But we need to notice one more thing, at bottom left we see 'Invalid Signature' message. Its because we did not pass our secret in verify signature section.
Now when we enter the value of JWT_SECRET from our .env file in the verify signature section, the 'Invalid Signature' message changes to 'Signature Verified'. In this way, we can use jwt.io for debugging purposes. Only paste your real secret into jwt.io for development tokens, never for production ones.
JWT Authentication - Middleware Usage
Once the user is logged in and has the JWT token, we can test the authentication middleware by accessing the /home route which only lets in logged in user with valid token. Create a new file named authenticationAPITest.rest in root folder and write the following code. Replace the placeholder with the token you received from the login response.
GET http://localhost:8000/home
Content-Type: application/json
authorization: Bearer yourJWTtoken
Here we are sending a GET request to our localhost at /home endpoint with JWT token in authorization header. Hit send request option above the first line and we will get the following response.
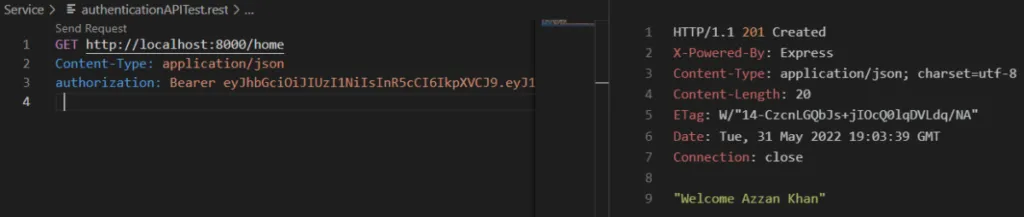
We see that user is able to access the /home route and we get response that we are sending from home controller along with status code 201.
Now if we try to tamper with the JWT token and send it in the authorization header, jwt.verify throws an error and the middleware responds with a 401 Unauthorized status and the error message, as shown in the catch block above.
Let's test one more scenario where we send an expired token. We set a 5 minute expiry time for the JWT token, so if we send another request after 5 minutes with the same token we generated above, jwt.verify throws an expiry error. The middleware again responds with a 401 Unauthorized status and the error message.
So thats it, that covers almost everything we need to know about implementing JWT authentication in NodeJs.
Missed out on key concept, JWT refresh token process. Learn about it here.
Summary
In this article we covered in detail about implementing JWT authentication in NodeJs with easy and simple to understand code. We also learned about the basics of JWT token, interacting with MongoDB with mongoose and MongoDB compass, User Registration, JWT token generation using jsonwebtoken package in NodeJs, hashing & comparing passwords using the bcrypt package, Express 5 framework, VSCode REST Client for API testing and much more.
To learn how to implement user registration, login and JWT authentication in Angular using this backend implementation checkout this article here.