
In this article we will learn how to run NodeJS applications on docker. We will take two examples of node applications, one a simple node app returning just 'Hello from docker!!' message as response, and another a full fledged node app with MongoDB that performs basic user registration, login and authentication.
Updated October 2026: Dockerfiles, Compose format, and image tags refreshed for current releases.
Checkout full source code for the implementation here for first application, and here for second one.
What is Docker ?
In simple words, Docker is a way to package an application so it can run on any hardware.
So basically docker is a solution to an age old problem - 'But it runs on my machine!!'
Docker solves problem like this by reproducing environments. To implement docker, there are three things we should know about, docker file, docker image and containers.
Docker File
A docker file is a set of instructions or a blueprint we define to build a environment to run the application. We can then use this file to rebuild the environment on any machine, which is saved as a docker image.
Docker Image
A docker image is immutable snapshot of the application or a template for running docker container. Images can be uploaded to cloud just like any code both in public and private repositories, which can later be pulled to create a docker container.
Docker Container
Docker container is nothing but a running process or a application. Single docker image can be used to spawn same docker container multiple times in multiple places.
Prerequisites
Before we start, make sure to install the following:
- Visual Studio Code
- NodeJS (24 LTS is the current Active LTS release)
- Express (the latest release is 5.3.0)
- MongoDB
- Docker desktop (includes the docker compose command)
Dockerizing a simple NodeJS application
Let's start with a simple NodeJS application which contains the following code in app.js file.
const express = require('express');
require('dotenv').config();
const port = process.env.PORT || "8000";

const app = express();

app.use('/', (req,res) => {
    res.status(200).send('Hello from Docker!!')
});

app.listen(port, () => {
    console.log(`Listening to requests on http://localhost:${port}`);
  });
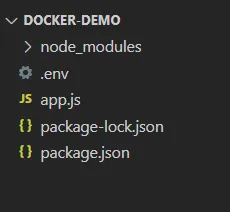
Here we have a express application which just returns a message when we navigate to localhost port 8000. Below are the rest of files in the root folder
Creating Docker File
To start dockerizing the application, let's first make sure to install the docker extension available in vs code. Now let's create a file named Dockerfile (no extension) which will contain the following code.
FROM node:24-alpine
WORKDIR /app
COPY package*.json ./
RUN npm ci --omit=dev
COPY . .
ENV PORT=8000
EXPOSE 8000
USER node
CMD [ "npm", "start" ]
Here each line instruction is considered a step or a command executed in sequence. Let's break down each step to understand what exactly we are doing here
Line 1: First step is to choose a runtime like ubuntu or a base image. In our case we are using node:24-alpine. The 24 tag points to Node.js 24, the current Active LTS release, so the image gets security and patch updates without us changing the Dockerfile. The alpine variant is built on Alpine Linux and is much smaller than the default image, which keeps our image small.
Line 2: Here we are creating a work directory in docker, from here on now any file operation we do, will be done inside this directory. We use an absolute path for it.
Line 3: here we are copying package.json and package-lock.json files from our root project directory to docker app/ directory. Copying these two files before the rest of the source lets Docker cache the dependency install layer, so it is only re-run when the dependencies change.
Line 4: Now using the lockfile, here we are installing all the dependencies required to run the application. npm ci installs the exact versions from package-lock.json and is faster and more predictable than npm install for builds. The --omit=dev flag skips devDependencies, so runtime dependencies such as express and dotenv must be listed under "dependencies" in package.json.
Line 5: copying rest of the files in our project folder to docker app/ directory. But here we have to take care of the files and folder we do not want to copy, for example node_modules folder and .env file. So to take care of that, just like .gitignore file we have .dockerignore file, which we will create shortly.
Line 6: we are setting environment variable for port as we have done the same in our code.
Line 7: Here we exposing port 8000 of the container to listen to incoming requests. EXPOSE documents the port, but it does not publish it to our machine; that is done with the -p flag when we run the container.
Line 8: By default the node image provides a non-root user called node. Running the application as this user instead of root limits the damage if the app is ever compromised.
Line 9: here we define the command to run the node application, just make sure to add the start script in package.json file. Note that npm does not forward stop signals to the app, so for production you may prefer CMD ["node", "app.js"].
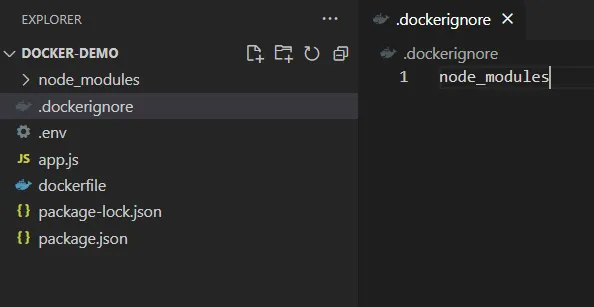
This completes our docker file definition. Next we create a .dockerignore file in the same folder, which keeps unnecessary and sensitive files out of the image:
node_modules
npm-debug.log
.env
.git
Below are the files in our root folder now, with .dockerignore content
Building Docker Image
Now using the docker file we can build docker image with the following docker build command
docker build -t azzan93/dockerdemo:1.0 .
Here -t is used to give the image a name tag. azzan93 is my dockerhub username, you can create one for free on dockerhub, then we gave the name tag as dockerdemo and version 1.0 and '.' is the path of the docker file. Let's run the command in the terminal. To pick up the newest patch release of the base image, you can add --pull to the command.
Once the build finishes, the image is stored locally with the name and tag we gave it. It can also be seen in Docker Desktop under Images. To use this image we usually push this to a container repository like docker hub or any cloud provider and the command we use for that is docker push and to retrieve it docker pull just like git command. But here we just want to run it locally, so let's do that.
Running Docker Container
To run the container we use the following command
docker run azzan93/dockerdemo:1.0
where we have to give the image name and tag (or the image id) to specify which image we are using, lets hit it and see the result
When the command runs successfully, the console shows that the app is listening to requests on localhost:8000.
But if we try to navigate to localhost:8000 we cannot see anything there. why?
In our docker file we exposed port 8000, this port is a docker port not a localhost port, which is not accessible to the outside world . So to access the docker container port we will have to implement something called port-forwarding, which is when we map a port from our local machine to a port on docker container. Let's understand it by using the below command
docker run -p 4200:8000 azzan93/dockerdemo:1.0
Here we used -p flag to indicate port forwarding, 4200 is the port on our local machine which is being mapped to port 8000 on container. Now we have to hit localhost:4200 in browser to check if the container is running.
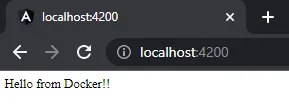
As you can see that our container is up and running.
One thing to take care of is, our container will still be running when we close the terminal. To manage the container we can use docker desktop. Add -d to the run command if you want it to run in the background.
Docker Desktop lists our container with options to manage it, like stop, start, delete etc.
Dockerizing NodeJS and MongoDB application using Docker Compose
Now let's dive deeper, and try to dockerize a full fledged Node application having MongoDB as database.
We will take an example of a node application we built in User Authentication in NodeJS using Passport.js (local strategy) article.
You can also find the complete source for the application here.
Below is the project structure and files in this application.
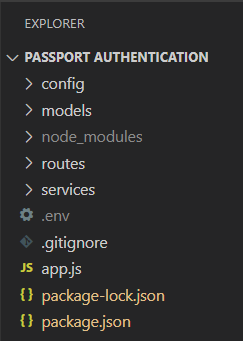
Here also we will start by creating a docker file with the following steps
FROM node:24-alpine
WORKDIR /app
COPY package*.json ./
RUN npm ci --omit=dev
COPY . .
EXPOSE 3000
USER node
CMD [ "npm", "start" ]
Here we have most of the same steps as we defined in the previous application. The main difference is that the port and the environment variables are not set in the Dockerfile this time. We expose port 3000 as the port the app listens on, and Compose will supply the rest of the configuration at runtime. Also make sure to add node_modules in .dockerignore file, as we did before.
Now this application is not just plane NodeJS but requires MongoDB as well which runs on another port. This is where docker compose comes into play, it helps in running multiple docker containers at the same time.
To use docker compose we need to define a compose.yaml file with following instructions. Compose uses the Compose Specification, so there is no version: key at the top of the file. Older tutorials use docker-compose.yml with a version line, which is no longer needed.
services:
  #mongo database container
  mongodb:
    container_name: 'database_container'
    image: mongo:9
    restart: always
    volumes:
      - mongoDB:/data/db

  #nodeJS service
  node:
    build: .
    ports:
      - 8000:3000
    environment:
      PORT: 3000
      DB_URI: mongodb://mongodb:27017
      SESSION_SECRET: expressSessionSecret
    depends_on:
      - mongodb

volumes:
  mongoDB: {}
Top level services: under services we need to define all the containers we will be using. There is no version line to set, because the Compose Specification does not use one.
The mongodb service: First we are defining the mongo container by giving container name and importing the official mongo image, just like we did for node in dockerfile. We use the mongo:9 tag, which is the current MongoDB 9 release line. Setting restart: always makes the mongo container restart in case of any failures.
Volumes: When we shut down the containers, we lose the state of the application. To avoid this, we can make use of volumes. Here we defined a volume and attached it to mongodb container and gave the default path of mongo storage (/data/db) to the volume.
The node service: First step is building the image by providing the path of the Dockerfile we created. Here we are using port forwarding to map port 8000 of local machine to port 3000 of docker node container. depends_on makes sure mongodb is started before the node app, although it does not wait until MongoDB is ready to accept connections.
Environment variables: Here you will notice that in DB_URI, instead of giving localhost:27017 we gave mongodb:27017, this is because inside a container localhost refers to the container itself, not to other containers. Here we are connecting to port 27017 of the mongodb service we created above, using the service name as the hostname. The SESSION_SECRET value is only suitable for local testing. For anything beyond that, keep real secrets out of compose.yaml and load them from an environment file or a secrets manager.
Finally, just like services we need to define if we are using any volumes, which we do at the bottom of the file.
Now our project should contain the new Dockerfile, the .dockerignore file and the compose.yaml file alongside the existing application files.
Now to use docker compose we need to use the below command
docker compose up
Now based on our instructions, this command will build and run both the containers. Add -d to run them in the background, and use docker compose down to stop and remove them.
Once it is running, both the mongo and NodeJS containers should be up. You can confirm this with docker compose ps, or check in Docker Desktop.
Now if we navigate to localhost:8000 in browser we should see the entire application in action as shown below.
This setup has no MongoDB authentication enabled, which is fine for trying things out on your own machine. If you expose the database beyond your machine, set MONGO_INITDB_ROOT_USERNAME and MONGO_INITDB_ROOT_PASSWORD on the mongodb service and update DB_URI to include those credentials.
Debugging in Docker Container
We can use Docker Desktop to check logs of our application. The logs view has a search option to search through the output of the node container.
The container also has an inspect option, which shows all environment variables defined for our application as well as the ports of the container and the matching ports on localhost. There is also a stats option to monitor the container's CPU, memory and network usage.
The same information is available from the terminal with docker compose logs and docker compose ps.
This almost covers our tutorial on running NodeJS applications on docker.
Also checkout this article to learn how to implement JWT Authentication in NodeJS.