
Updated October 2026: AWS console steps, AMI, and Node.js setup refreshed for current releases.
Any application that we develop cannot just sit on our local machines and has to be deployed somewhere for others to access it, and cloud seems like an ideal and cost effective choice to do that. So, in this article we will take an example of the most popular cloud service provider, that is, AWS and learn how to deploy a NodeJS application with MongoDB as a database on AWS EC2 instance.
In this article we will deploy the application we built in User Authentication in NodeJS using Passport.js article.
Prerequisites
Before we start, make sure to obtain or install the following:
- AWS account (the EC2 free tier or AWS free plan covers the instance we use here)
- MongoDB Atlas account (free tier) for the database, or a Linux instance you are comfortable managing yourself
- PuTTY - a free SSH and telnet client (if you are using Windows; Windows 10/11, macOS and Linux include an OpenSSH client that works just as well)
Launching a new AWS EC2 instance
Let's begin by logging in to AWS console. Once logged in, we can search for EC2 in the search bar and select the first option. You will be greeted with an EC2 dashboard as shown below.
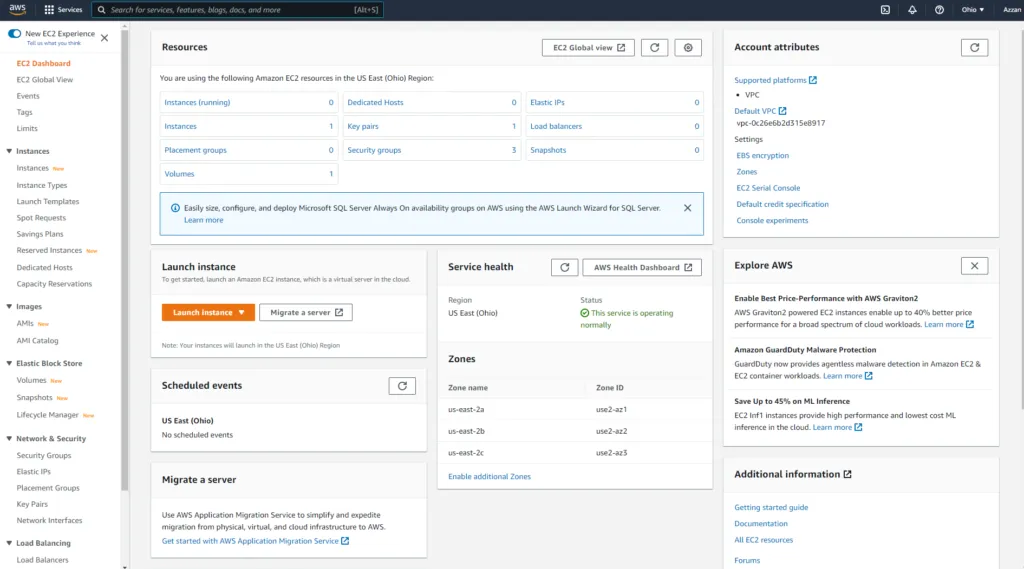
From here we can launch a new instance by clicking on the Launch instance button, which opens the launch wizard.
Under Application and OS Images (Amazon Machine Image), make sure Amazon Linux 2023 AMI is selected. It is the default Amazon Linux release now and receives support until 2028, so we will use it throughout this article. (Amazon Linux 2 is end of life, and its yum commands are replaced by dnf on AL2023.) Give the instance a name of your choice, and for Instance type pick t3.micro, which is free tier eligible in most accounts. Older guides use t2.micro, which is now a previous-generation type.
Leave the rest of the settings as they are. Under Network settings the wizard already allows SSH (port 22). For Allow SSH traffic from, choose My IP rather than Anywhere so that only your computer can reach the SSH port. Next is the key pair option, which we will have to generate if we don't have an existing key pair. We use this key pair to connect to our EC2 instance. So click on Create new key pair and you will get the below screen.
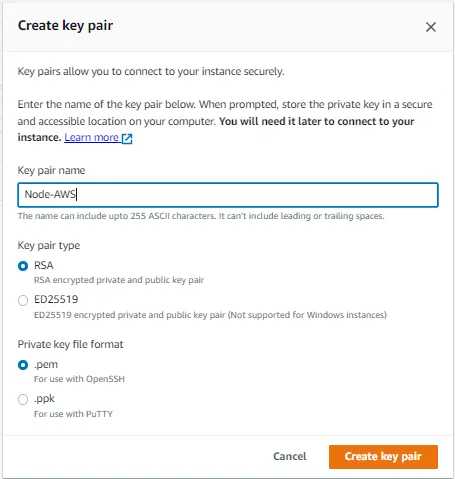
Give a name to your key pair as shown and keep the key type as RSA (ED25519 also works). Now if you are using Windows with PuTTY, choose the .ppk format. Otherwise choose the .pem format to connect using OpenSSH. Once you click Create key pair, a file will be downloaded. Keep it safe, as it is the only way to connect to the EC2 instance.
Now with everything done, we can click on the Launch instance button to launch our AWS EC2 instance. When we go to our instances screen we should see the following status before trying to connect to it.

Connecting to AWS EC2 instance
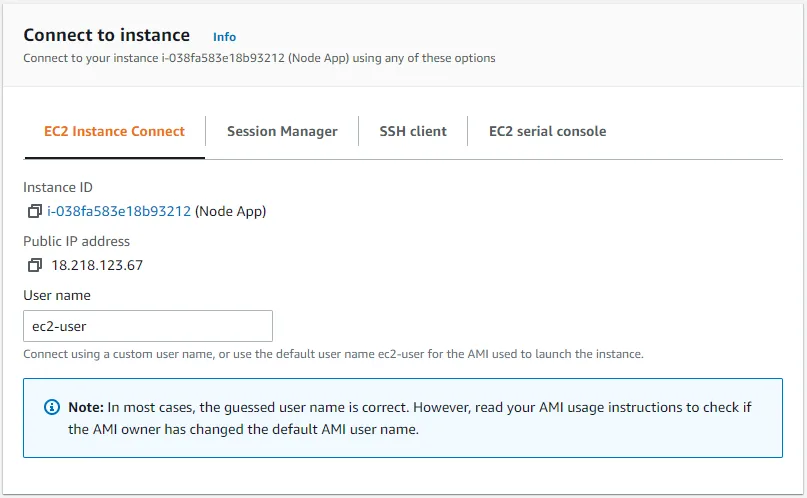
Now to connect to our AWS EC2 instance, click on the instance ID and then the Connect button on the next screen. We will see the below screen now.
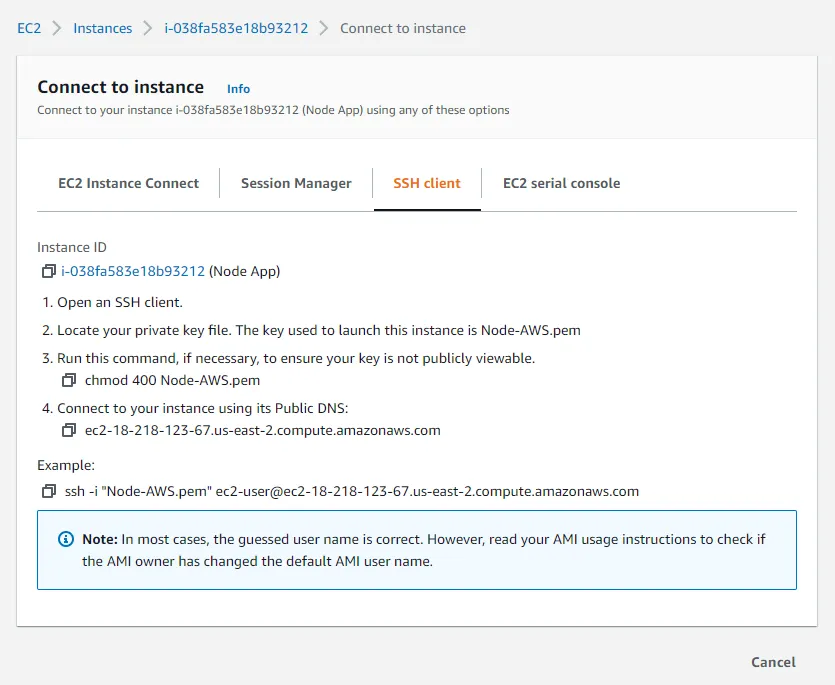
This screen shows the instructions we have to follow to connect to our AWS EC2 instance. You can use the EC2 Instance Connect tab to open a browser-based terminal with no extra setup, or follow the SSH steps below. So let's now open PuTTY.
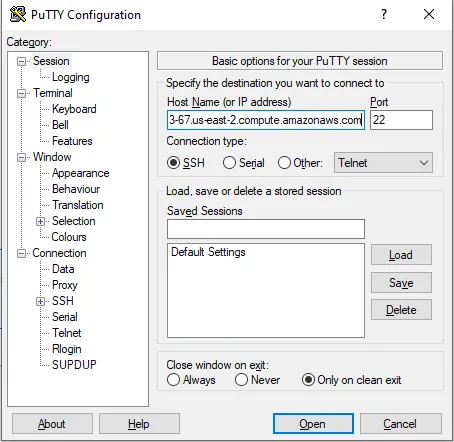
Here under host name we will have to copy paste the public DNS (or the public IPv4 address) of the EC2 instance. Then on the same screen under category navigate to Connection-->SSH-->Auth (in newer PuTTY versions, Auth is under Credentials) and we will get the below screen.
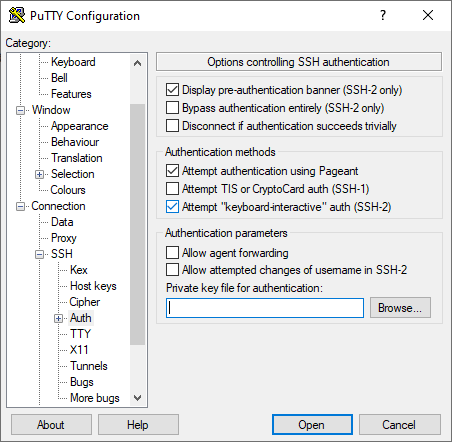
Browse to the key pair we generated and saved on our machine and click on open. Now, when you connect to the instance for the first time, you will see a security alert that asks whether you trust the host to which you are connecting. Choose accept, and a terminal will open prompting you to enter the username. For instances launched from the Amazon Linux 2023 AMI, the username is ec2-user. You can confirm the username on the connect screen below.
On entering the username in the terminal you will be successfully connected to the AWS EC2 instance.
Installing NodeJS on AWS EC2 instance
Now that we are connected to our EC2 instance, the first thing we need to do is apply all the updates. Amazon Linux 2023 uses dnf as its package manager, which replaces yum.
sudo dnf update -y
With this out of the way, we can stay as the ec2-user and use sudo only for system-wide installs. There is no need to switch to root, and Node.js is easier to manage as a regular user.
Now let's check if our EC2 instance already has NodeJS by running node -v. On a fresh instance you will get a command not found error, which means node is not installed on the system. The old approach of adding NodeSource's RPM repository for Node 16 is no longer recommended, since Node 16 has reached end of life. Instead we will install Node.js with nvm (Node Version Manager), which is one of the install options listed on nodejs.org. Run the below command to install nvm:
curl -o- https://raw.githubusercontent.com/nvm-sh/nvm/v0.40.3/install.sh | bash
Once nvm is installed, load it into the current session and then install the current Node.js LTS release (the 24.x line at the time of writing):
source ~/.bashrc
nvm install --lts
nvm use --lts
Now after successfully executing the above commands, we should be able to use the node command to check the Node.js and npm versions.
node -v
npm -v
Once these commands print version numbers, we have successfully installed NodeJS on our EC2 instance.
Setting up MongoDB for the application
Now as most applications require a database, in our case it would be MongoDB. Today the recommended option is MongoDB Atlas, MongoDB's fully managed cloud service. Atlas handles backups, patching and upgrades for you, and it keeps the database off your web server. For a learning project it also has a free tier. The steps below use Atlas, and self-hosting on the same instance is covered afterwards as an alternative.
To use Atlas, sign in at mongodb.com/atlas and follow these steps:
- Create a free M0 cluster.
- Create a database user with a username and a strong password.
- Under Network Access, add the public IPv4 address of your EC2 instance to the IP access list. Avoid allowing 0.0.0.0/0 for a database.
- Click Connect, choose Drivers, and copy the connection string, which starts with
mongodb+srv://. Replace the password placeholder with your database user's password.
We will use this connection string as the DB_URI environment variable later on.
Alternative: installing MongoDB on the EC2 instance
If you want to run MongoDB on the same instance instead, be aware that MongoDB's Community Edition install guide currently covers Red Hat Enterprise Linux, CentOS, Rocky Linux, AlmaLinux, Oracle Linux and Ubuntu. Amazon Linux 2023 is not on that supported list, so treat the steps below as unsupported, and enable authentication before exposing the instance to the internet. As the MongoDB documentation suggests, we need to create a 'mongodb-org-9.0.repo' file in the path '/etc/yum.repos.d/'.
Now as the documentation suggests, we will have to copy the following content into the file. The 9.0 repository is the RHEL 9 build, which is the closest match for Amazon Linux 2023.
[mongodb-org-9.0]
name=MongoDB Repository
baseurl=https://repo.mongodb.org/yum/redhat/9/mongodb-org/9.0/x86_64/
gpgcheck=1
enabled=1
gpgkey=https://pgp.mongodb.com/server-9.asc
To do this, we will open the file using the command 'sudo vi /etc/yum.repos.d/mongodb-org-9.0.repo', and paste the above content. Once done, hit the Esc key, type ':wq' and hit enter.
Now if we run the 'cat /etc/yum.repos.d/mongodb-org-9.0.repo' command, we should be able to see the file's content.
Now we can use the below command to install the latest stable version of MongoDB Community Server
sudo dnf install -y mongodb-org
Now that we have installed MongoDB, we can start it and enable it to start on boot using the below commands. Amazon Linux 2023 uses systemd, so we use systemctl instead of the older service command.
sudo systemctl start mongod
sudo systemctl enable mongod
sudo systemctl status mongod
If you use this self-hosted option, the connection string we pass as DB_URI later will be mongodb://localhost:27017.
Deploying NodeJS application on AWS EC2 using GIT
Now we will proceed to deploy our application on EC2 instance using git.
Installing Git on AWS EC2
First thing we need here is to have git installed as well on our EC2 instance. We can use the following command to do that
sudo dnf install -y git
After this we can check if git is installed using the git command

As seen above git is successfully installed on our EC2 instance.
Cloning Git Repository on AWS EC2
Now with the help of below git command we will clone our Github repository in our EC2 instance.
git clone https://github.com/AzzanKhan/NodeJS-Authentication-using-Passport.git
Once the clone finishes, you will see a folder named 'NodeJS-Authentication-using-Passport' which contains our application code.
Setting Up and Running NodeJS application on AWS EC2
Now we have to cd into the project folder and first thing we need to do is install all the dependencies listed in package.json file using the below command
cd NodeJS-Authentication-using-Passport
npm install
This completes our application setup and we can now go ahead and run the application. But our application reads certain environment variables defined in .env file, like ports and session secret. Ideally there are a few AWS-native ways to pull environment variables into your Node app on EC2, like AWS Secrets Manager or AWS Systems Manager Parameter Store, but we will keep things simple for now and pass the environment variables along with the run command as below. Use your own Atlas connection string for DB_URI, and generate a long random value for SESSION_SECRET (for example with openssl rand -hex 32) instead of reusing a placeholder.
PORT='8080' DB_URI='mongodb+srv://<user>:<password>@<cluster>.mongodb.net/<dbname>' SESSION_SECRET='<long-random-secret>' npm start
Once it starts, the application listens on port 8080 on the EC2 instance.
The app stops when we close the SSH session. To keep it running in the background and restart it after a reboot, we can use PM2, a popular Node.js process manager (version 7.0.4 at the time of writing). Install it without sudo, since Node is managed by nvm, and start the app with the same environment variables:
npm install -g pm2
PORT='8080' DB_URI='mongodb+srv://<user>:<password>@<cluster>.mongodb.net/<dbname>' SESSION_SECRET='<long-random-secret>' pm2 start npm --name nodejs-auth -- start
pm2 save
pm2 startup
The pm2 startup command prints one more command that starts with sudo; copy and run it so PM2 comes back after a reboot. You can check the app with pm2 status and pm2 logs nodejs-auth.
Enabling public access to AWS EC2 port
Now to open this application in the browser we need to allow access to the EC2 port by adding inbound rules to the EC2 security group. For this, open your AWS console and navigate to EC2 --> Instances, select your instance, then open the Security tab and click the security group link. Choose Edit inbound rules and make the changes described below.
Add a Custom TCP type rule to allow public access to port 8080, where our application is running. Set the source to Anywhere-IPv4 (0.0.0.0/0) so browsers can reach the app. Add a separate rule for each port you need rather than opening All TCP, and never open MongoDB's port 27017 to the internet. Once the rule is saved, the port is open to the public.
Now we can open the application in the browser by navigating to the public IPv4 address of our EC2 instance with port 8080, which in my case is http://3.129.44.225:8080/. Use your own instance's public IPv4 address instead.
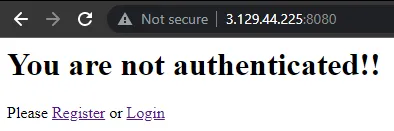
As you can see now we can access our application which is running on AWS EC2 instance.
This completes our successful deployment of a NodeJS and MongoDB application on AWS EC2 using Git. One thing to keep in mind is that this tutorial is just to get a basic understanding of how we can deploy an application on AWS EC2 for others to access and test. The practices followed in this article are not the best practices for deploying a production-ready app on EC2. For production, put the app behind an HTTPS reverse proxy or load balancer, use an Elastic IP so the address does not change, keep secrets in AWS Secrets Manager or Parameter Store, and stop or terminate the instance when you no longer need it to avoid charges.
You can also checkout this article to learn Using Docker to Containerize NodeJS and MongoDB Application.